Serverless OAuth with Multiple Providers
This example shows how to use multiple OAuth providers (Google and Github in this case) to authenticate to a serverless application hosted on Begin.com or Architect. Authentication is who a user is, and authorization (also called permissions) is what a user see or do. Both are important, but only authentication is covered here. No auth libraries, services or provider SDK's are used. With Lambda fewer dependencies give faster starts. Begin.com specifically limits dependencies to 5mb to encourage this best practice.
To focus on the OAuth code this app is as minimal as possible. The app.arc manifest file below shows the five routes. The first route / is accessible to guests and authenticated users. The /admin route is only visible to authenticated users and redirects to /login otherwise.
#app.arc@appoauth-example@httpget /get /adminget /authget /loginpost /logout
To see the whole app feel free to clone the oauth-example repo. To try it for yourself you can deploy it directly to Begin.
OAuth overview
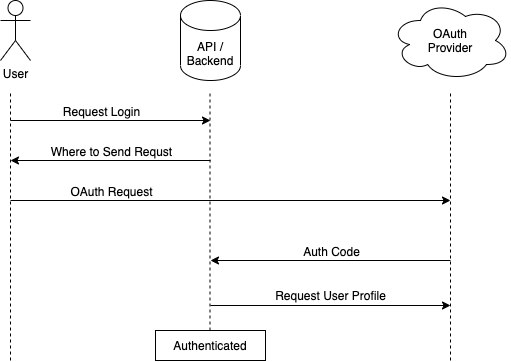
The basic OAuth flow is shown below. A user requests a login to the app and is presented with options to authenticate to any of the available providers. The links to those providers send a request from the user directly to the provider. After signing in to the provider a response is sent to the server with a token. The server uses that token to send a request to the provider for the user profile using that token. With the response the user is then authenticated to the app.

Login Request
When a user requests /login (or is redirected there) the route generates URL's for each of the providers. If they were redirected there a "next" parameter (i.e. /login?next=admin) points back to the original page. The next parameter is checked against valid options (only admin here) to protect a user from being directed to a malicious site after authenticating.
//src/http/get-login/index.jsconst arc = require('@architect/functions');const githubOAuthUrl = require('./githubOAuthUrl');const googleOAuthUrl = require('./googleOAuthUrl');async function login(req) {let finalRedirect = '/';if (req.query.next === 'admin') {finalRedirect = '/admin';}const googleUrl = await googleOAuthUrl({ finalRedirect });const githubUrl = githubOAuthUrl({ finalRedirect });return {status: 200,html: `<!doctype html><html lang="en"><head><meta charset="utf-8"><meta name="viewport" content="width=device-width, initial-scale=1"><title>login page</title></head><body><h1>Login</h1></br><a href="${githubUrl}">Login with Github</a></br><a href="${googleUrl}">Login with Google</a></body></html>`,};}exports.handler = arc.http.async(login);
State Parameter
The state query parameter helps make sure the request that comes back was initiated by the server. One option is to generate a secure random number stored by the server, and then matched to the request that comes back. In this example a JSON Web Token (JWT) is used. The JWT is a cryptographically signed payload that contains the provider and the final redirect location (that comes from the next parameter). This JWT has a one hour expiration set. It only needs to remain valid long enough to complete the authentication.
//src/http/get-login/githubOAuthUrl.jsconst jwt = require('jsonwebtoken');module.exports = function githubOAuthUrl({ finalRedirect }) {let client_id = process.env.GITHUB_CLIENT_ID;let redirect_uri = encodeURIComponent(process.env.AUTH_REDIRECT);let state = jwt.sign({provider: 'github',finalRedirect,},process.env.APP_SECRET,{ expiresIn: '1 hour' });let url = `https://github.com/login/oauth/authorize?client_id=${client_id}&redirect_uri=${redirect_uri}&state=${state}`;return url;};
Google URL
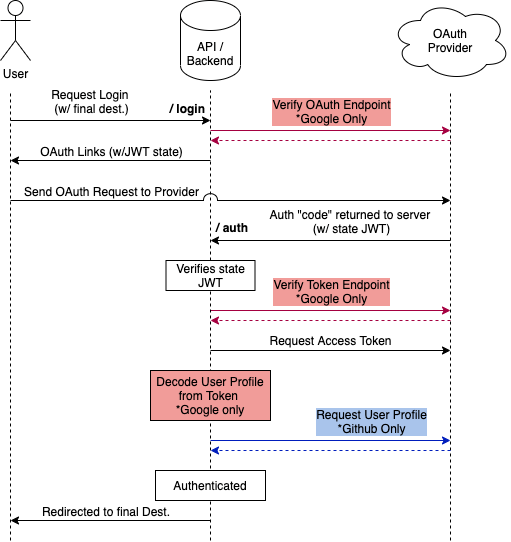
The Google URL is similar to the Github function except for the GET request at the top. Google's OAuth documentation recommends verifying the authentication endpoint by a request to the "openid-configuration" document. If google changes the actual endpoint path it is updated in this document. This document is aggressively cached and the request will usually be returned from there.
//src/http/get-login/googleOAuthUrl.jsconst tiny = require('tiny-json-http');const jwt = require('jsonwebtoken');module.exports = async function googleOAuthUrl({ finalRedirect }) {const googleDiscoveryDoc = await tiny.get({url: 'https://accounts.google.com/.well-known/openid-configuration',headers: { Accept: 'application/json' },});const authorization_endpoint = googleDiscoveryDoc.body.authorization_endpoint;const state = await jwt.sign({provider: 'google',finalRedirect,},process.env.APP_SECRET,{ expiresIn: '1 hour' });const options = {access_type: 'online',scope: ['profile', 'email'],redirect_uri: process.env.AUTH_REDIRECT,response_type: 'code',client_id: process.env.GOOGLE_CLIENT_ID,};const url = `${authorization_endpoint}?access_type=${options.access_type}&scope=${encodeURIComponent(options.scope.join(' '))}&redirect_uri=${encodeURIComponent(options.redirect_uri)}&response_type=${options.response_type}&client_id=${options.client_id}&state=${state}`;return url;};
Auth Redirect from Provider
After the user has signed in with their chosen provider (Google or Github) they will be redirected back to the /auth route with a code and state parameter set. State should be the exact same state that was sent to the provider. The code parameter is a token that is used to access the user profile information. The route handler for /auth is shown below. It decodes the state JWT to verify that the request was initiated by the app and to determine which provider sent the authorization code.
//src/http/get-auth/index.jsconst arc = require('@architect/functions');const githubAuth = require('./githubAuth');const googleAuth = require('./googleAuth');const jwt = require('jsonwebtoken');async function auth(req) {let account = {};let state;if (req.query.code && req.query.state) {try {state = jwt.verify(req.query.state, process.env.APP_SECRET);if (state.provider === 'google') {account.google = await googleAuth(req);if (!account.google.email) {throw new Error();}} else if (state.provider === 'github') {account.github = await githubAuth(req);if (!account.github.login) {throw new Error();}} else {throw new Error();}} catch (err) {return {status: 401,body: 'not authorized',};}return {session: { account },status: 302,location: state.finalRedirect,};} else {return {status: 401,body: 'not authorized',};}}exports.handler = arc.http.async(auth);
Request User profile
The final step in the OAuth sequence is to get the user profile. For Github a POST request is sent using the code along with the client_id and client_secret. Github responds with an access token. This token is then used to make a GET request for the user profile. With this the user profile is finally returned stored to the Architect/Begin session. The user is now authenticated for any further requests to the app.
//src/http/get-auth/githubAuth.jsconst tiny = require('tiny-json-http');module.exports = async function githubAuth(req) {try {let result = await tiny.post({url: 'https://github.com/login/oauth/access_token',headers: { Accept: 'application/json' },data: {code: req.query.code,client_id: process.env.GITHUB_CLIENT_ID,client_secret: process.env.GITHUB_CLIENT_SECRET,redirect_uri: process.env.AUTH_REDIRECT,},});let token = result.body.access_token;let user = await tiny.get({url: `https://api.github.com/user`,headers: {Authorization: `token ${token}`,Accept: 'application/json',},});return {name: user.body.name,login: user.body.login,id: user.body.id,url: user.body.url,avatar: user.body.avatar_url,};} catch (err) {return {error: err.message,};}};
Google also requires verifying the token endpoint before final authentication (similar to the inital step). Again this response is aggressively cached to minimize unnecessary requests. Getting the user profile with Github requires a POST for the access token and a GET with that token for the user profile. Google combines these two. With one POST request we receive an id_token that is a JWT with the user profile. The JWT is then decoded to get the user profile information.
//src/http/get-auth/googleAuth.jsconst tiny = require('tiny-json-http');const jwt = require('jsonwebtoken');module.exports = async function googleAuth(req) {let googleDiscoveryDoc = await tiny.get({url: 'https://accounts.google.com/.well-known/openid-configuration',headers: { Accept: 'application/json' },});let token_endpoint = googleDiscoveryDoc.body.token_endpoint;let result = await tiny.post({url: token_endpoint,headers: { Accept: 'application/json' },data: {code: req.query.code,client_id: process.env.GOOGLE_CLIENT_ID,client_secret: process.env.GOOGLE_CLIENT_SECRET,redirect_uri: process.env.AUTH_REDIRECT,grant_type: 'authorization_code',},});return jwt.decode(result.body.id_token);};
Setup OAuth with Providers
In order to authenticate with Google and Github you need to set this up with both providers.
Github Setup
For Github.com navigate to: settings -> developer settings -> oauth apps -> new oauth app. From there fill out form as required. Make sure the callback url matches the full domain and path for your app. The domain for staging and production can be found in the Begin settings. More details can be found on the Github Docs.
Google Setup
Googles console is more complicated to navigate. Start by signing up for a developer account at https://console.cloud.google.com/. Setup a new project and go to the "API & Services" dashboard. Configure the "OAuth consent screen" for external users. Then chose the credentials -> create credentials -> oauth client ID. Follow the "web application" setup and enter the redirect uri and other info for your app.
Full OAuth flow
The full OAuth flow diagram is shown below. Google only steps are shown in red and Github only are shown in blue.

